If you’re wondering how to fix red eye on iPhone photos, read on. Here are some tips. Using a flash is not recommended if you’re trying to take pictures of yourself. Also, try not to look directly into the camera when you’re taking pictures. Your iPhone is equipped with a built-in tool to fix red eye in pictures. To use this tool, simply open the photo with the problem and tap on the “Edit” option in the upper right corner. Next, tap the icon of an eye with a slash through it. If you’ve got a different model, this feature may not be present.
To fix red eye on iPhone photos, first open the Photos app. Tap on the layered rectangle icon, which represents the album. Tap on the “All Photos” option and then choose the image you wish to edit. Then, tap on “Edit” to open the editor. Once you’ve selected the image you want to edit, tap on the “Red Eye Correction” icon. Then, select the image that has the red eye problem. The red-eye icon should appear with a slanting line in it.
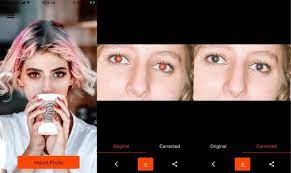
To use this feature, tap on the red eye on the photo. If the photo has more than one red eye, tap on the first one. If you’re trying to fix two red eyes, tap on the second one. The second photo will be corrected automatically, and you can save the corrected photo to your Photos app. If you’re using an older version of iOS, make sure you update to the latest version of iOS.
Once you’ve completed the steps above, you can use the Photos app to remove red eye. Once you’ve selected the photo, tap on the Refine button. This will give you more options and make the red eye disappear. You can also select the red eye removal tool to apply to any picture that you’ve already edited. If you don’t want to use the Photos app, you can also download third-party tools that can process multiple photos.
One of the most common ways to fix red eye on iPhone photos is by using the native app to do so. This app requires iOS 7.0 or later. To use the native app, you need to be using a photo editor. Once you’ve installed the app, import the photo from the camera roll into the app and it will automatically detect the red eyes and remove them. Then, you can share the finished image. This app has several editing options that make it easy to fix red eye on iPhone photos.
The third-party apps can help you deal with red eye on iPhone. However, if you’re more comfortable using the iPhone’s built-in red eye tool, you can also download the free version of the application. Just be sure to share and like the post if you find it useful. If you’ve found this method helpful, don’t forget to share it with your friends! And don’t forget to follow these steps to remove red eye on iPhone photos!
First, open the Photos app. This app will show all your photos. Select the photo you want to edit and tap on the eye icon to get rid of the red eye. Click the “Red Eye Correction” icon on the top-right corner of the screen to start the correction process. Afterward, you can save your photo by selecting “Reset” and adjusting the color and contrast of the photo. This simple trick should fix red eye on iPhone photos.
The red eye tool isn’t effective on pictures of animals. It only works on photos with an eye that contains a different-colored flash. For this reason, a red-eye tool may not be useful on photos of these creatures. If the eyes of a cat, dog, or other animal appear to have different-colored pupils, you’ll need a third-party app. And don’t forget to make sure to check the settings before you begin the process.
If you’re looking for a reliable red-eye removal app for iPhone or Android, then look no further. Red Eye Corrector & Remover AI is one of the best photo-editing apps on the market, and it’s free! You can download the app for free, and try it out for yourself. You’ll be glad you did! It’s free and won’t have any In-App purchases.