Before you start repairing your cracked plastic, you should gather your materials and supplies. Gather your adhesive, tissue paper, and protective gear. Work in a well-ventilated room and wash your hands afterward. Wear gloves to protect your hands while working with adhesives. The surface you want to join must be close fitting and free of any residue. If your plastic isn’t cracked, the glue may not adhere. You can use a silicone adhesive.
Identifying the type of plastic
In the case of automotive parts, identifying the type of plastic is essential. The International Standards Organization (ISO) has provided markings for plastics to help technicians identify different kinds of materials. These markings can include PP for polypropylene, PO for polyolefin, ABS for acryliconitrile-butadiene-styrene, and PVD for polyvinyl chloride. Plastics that do not melt are marked with the type of plastic, while polymer blends are marked with both types of plastics.
The type of cracking that causes the most problems in healthcare is caused by environmental stress. Environmental stress cracking occurs when chemical agents come into contact with plastic. The chemical attack would not have had any effect on the plastic if it were in an unstressed state. Cracks that form in this state are typically spider-web-like, and crazing is often present in the area of stress. This type of failure can result in serious problems in a product, including expensive warranty claims and legal disputes.
Choosing the best adhesive
There are different types of plastics that need different types of adhesives to fix cracks. The type you choose should be based on the type of plastic. Most of the time, two-part epoxy glues work best. They are waterproof and can bond a wide variety of plastics, including HDPE, which is the same material used to make hard hats. Flexible plastics like polyethylene sheets need a flexible glue, such as Loctite 60 Second All-Purpose Glue.
Another consideration is price. While high-priced products often perform better, they are not necessarily the best option. Make sure the price of the glue is comparable to its quality and the quantity you will need. If you are working with a limited budget, it’s better to get a low-cost product. The right glue can make the plastic repair process much easier. A good adhesive can save you time and money, so be sure to do research before you buy one.
Applying primer
When you decide to repaint your car, one of the first steps you should take is applying primer. Plastic primer is an important part of the paint-repair process because it optimizes the adhesion of subsequent paint layers. It also prevents paint from detaching from the surface. Read on to learn more about this important part of the repainting process. After you have applied primer, you can paint your vehicle!
Before applying primer, you should prepare the surface for it. Clean it thoroughly, and use a sanding paper if necessary. Do not sand bare plastic, because the paint will show through the primer. Follow the recommendations of the paint maker for adhesion promotion. This will ensure a full repair. In addition to sanding, you can apply a sealer or catalyzing basecoat.
Creating a V-groove
If you’ve cracked your plastic car bumper and want to repair it yourself, creating a V-groove around the perimeter can be done in a couple of steps. First, tack weld the corners of the panel. This prevents it from popping out again. If you don’t have a welder with a V-groove attachment, you can use a hot airless tip to melt the v-groove in.
Next, prepare the area with 80-grit sandpaper. If you’re working with ABS, you can use a Q-tip to test it. Then, take a V-groove file and notch the edges. This will increase the surface area and allow the glue to adhere to it more successfully. Once the v-groove has been created, apply the crack filler. This should penetrate half of the plastic, then repeat the process on the other side.
Filling holes in plastic
The first step in filling holes in cracked plastic is to clear the damaged area. Then, remove any decorative pieces. Trim off any excess plastic protruding from the crack. Next, drill a small hole on the crack end. Sand the repaired area and apply a second coat of putty. If you plan on using a fiberglass reinforcement tape, cut a scrap piece of the backing panel to fit over the damaged area.
Before you start the repair, carefully select a patch that is the same size and color as the crack. Use a soldering iron to melt the edges of the new patch and make sure that the entire surface is heated evenly. Wait for the patch to cool before using it. Using a soldering iron can be dangerous, so be sure to protect yourself from burns! Once the patch is cooled, apply the patch to the crack.
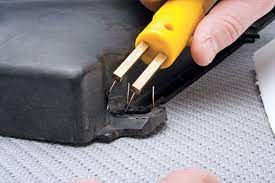
Using a soldering iron
Using a soldering iron to repair cracked plastic is an easy way to restore damaged items. Although the results may not be as good as a brand new item, the repair is still much cheaper than buying a replacement. A soldering iron is a handy workbench tool, so you don’t have to worry about spending money on an expensive model. Using one will also enable you to fix smaller pieces, such as a small crack on a piece of plastic.
When you are using a soldering iron, you must be careful to avoid getting burned. It can cause a lot of fumes. Be sure that the iron is not too hot, as it can melt the plastic. Always use a heat-resistant cover when you are soldering plastic. Once you have applied the patch, make sure to allow it to cool completely before removing it from the object.