How to Set up a VPN on Windows 11: This Article primarily focuses on guiding users through setting up a VPN on the new Windows 11 system. It details two distinct methods, providing comprehensive solutions accompanied by illustrative screenshots.
While Windows undergoes changes from version 10 to 11, the essential need for a VPN remains consistent. Whether accessing restricted websites due to geographic limitations or aiming to safeguard privacy by avoiding tracking, a VPN remains indispensable.
Understanding VPN Functionality:
How to Set up a VPN on Windows 11: A VPN extends a private network’s capabilities across public networks like the Internet. This facilitates the seamless transmission and reception of data on a host computer across shared or public networks, effectively integrating it as a component of the private network. This integration encompasses all functionalities, security measures, and management policies inherent in the private network.
Setting up a VPN on Windows 11:
How to Set up a VPN on Windows 11: The majority of VPN services offer dedicated applications that automatically establish a VPN connection. However, should you prefer manual configuration, the following guides provide step-by-step instructions for setup.
Method 1: Setting up VPN on Windows 11 via Settings
Generally, configuring a VPN through Windows Settings involves three main segments.
Part 1: Adding a VPN Account
- Go to Start > Settings > Network & internet > VPN.
- Click on the ‘Add VPN’ button located in the VPN connections section.
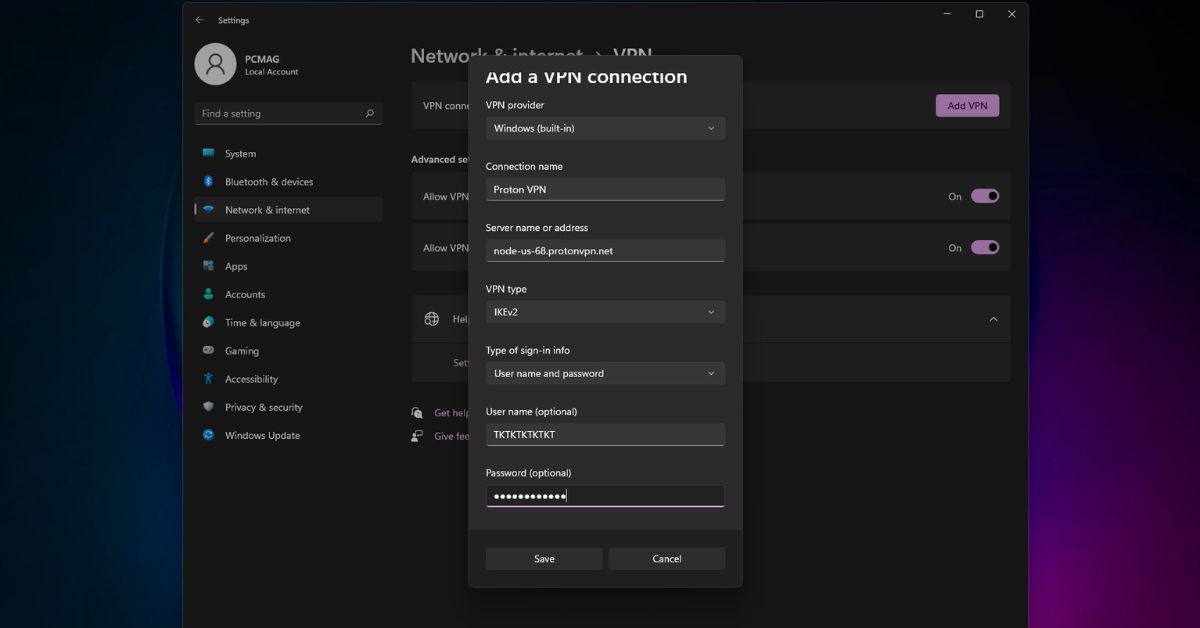
- In the ensuing pop-up, specify the following parameters:
- VPN provider: The default choice is Windows (built-in).
- Connection name: This name identifies the VPN. You can name it according to your choice.
- Server name or address: Provided by the VPN company, which might offer multiple locations. Input one location.
- VPN type: If aware of your VPN type, specify it for potentially faster speed. Otherwise, forsake it as the default Automatic.
- Type of sign-in info: For a free connection without a username or password, leave the additional boxes blank. If a username and password are required, input the details accordingly. A smart card can also be utilized.
Section 2: Adding a Certificate
- Press the Windows + R keys simultaneously to open the Windows Run dialog.
- Enter “mmc” and press Enter to access the Microsoft Management Console.
- Click on File > Add/Remove Snap-in.
- From the left list, select Certificates and click Add to include it in the right section.
- Opt for Computer account in the new window.
- Maintain the default settings and click Finish.
- Once redirected to the Add or Remove Snap-in window, click OK.
- Expand the Certificates (Local Computer) in the left panel of the Console window.
- Further unfold the Trusted Root Certification Authorities.
- Right-click on the Certificates subfolder and choose All Tasks > Import.
- In the Certificate Import Wizard pop-up, click Next on the welcome screen.
- Browse and select the correct certificate file. You might need to display all file types to detect the certificate file.
- Input the password for the selected certificate file and proceed by clicking Next.
- Retain the default selection and click Next.
- Click Finish.
- Upon the successful import prompt, click OK.
- Close the Console window and select No to decline saving console settings.
Section 3: Modifying Network Properties
Method 2: Setting up VPN on Windows 11 from Network and Sharing Center
- Access the Control Panel and set it to display items as icons in the upper right corner.
- Choose Network and Sharing Center.
- On the left hand side menu, Choose Change adapter settings.
- Right-click on the newly added VPN and select Properties.
- Within the new window, switch to the Networking tab. Tap on Internet Protocol Version 4 (TCP/IPv4) and then tap on the Properties.
- Select “Use the following DNS server addresses,” input your preferred and alternate DNS servers, and click OK.
- Tap on OK button and close the Network Connections window.
- To avoid routing all network connections through the VPN, click the Advanced button under the DNS server settings and deselect “Use default gateway on remote network.”
Alternate Method: Setting up VPN on Windows 11 via Network and Sharing Center
- Click on the Start menu in the taskbar’s center and choose Settings.
- In Windows 11 Settings, select Network & internet from the left panel.
- Scroll down on the right side and click on Dial-up under Network & Sharing Center.
- In the subsequent screen, choose Network and Sharing Center.
- Within the Network and Sharing Center, tap on “Set up a new connection or network.”
- In the new window, opt for “Connect to a workplace” to establish a dial-up or VPN connection to your workplace.
- Click on “Use my Internet connection (VPN).”
- You’ll then be prompted to input the Internet address (IP address or IP name) and Destination name (it can match the Internet address).
- Return to Change adapter settings in the Network and Sharing Center’s left menu to modify the properties of the added VPN, similar to the instructions in Method 1.
Once completed, your Windows 11 VPN setup is ready for connection.
How to Connect to my Added VPN in Windows 11?
How to Set up a VPN on Windows 11: Once the VPN has been successfully added, locate it listed under VPN connections in the Network and internet settings. To connect your computer to this VPN, simply click the “Connect” button.
Alternatively, you can access the VPN by clicking on the network icon in the taskbar. From the pop-up menu, select VPN, choose the desired VPN, and click on “Connect.”
To disconnect from the VPN, select the “Disconnect” option either within the Settings or directly from the taskbar.
If you wish to remove the added VPN, start by disconnecting it. Then, navigate to Network and internet settings, select the VPN, and click on “Remove.”
Read This: Google Chrome Cookie Tracking Protection