How to sign in to multiple Gmail accounts at once. This article discusses how to manage multiple Gmail debts at once. Follow these steps: Log in to your number one account, click ‘Add another account’ to display the larger accounts, switch between balances using your profile image, assign labels and colors , Choose a default account, and keep in mind the use of different web browsers for each account.
Dealing with multiple Gmail debts can become a challenge primarily for those balancing personal, professional, and different email addresses. Thankfully, Google offers a practical answer, allowing users to log into a few outstanding Gmail accounts at the same time.
How to sign in to multiple Gmail accounts at once. Effectively dealing with multiple Gmail bills at once provides a streamlined technique for email communication.
By following the instructions in this article and following the steps below, you can easily manipulate and organize your unique Gmail accounts.
Steps for How to sign in to multiple Gmail accounts at once
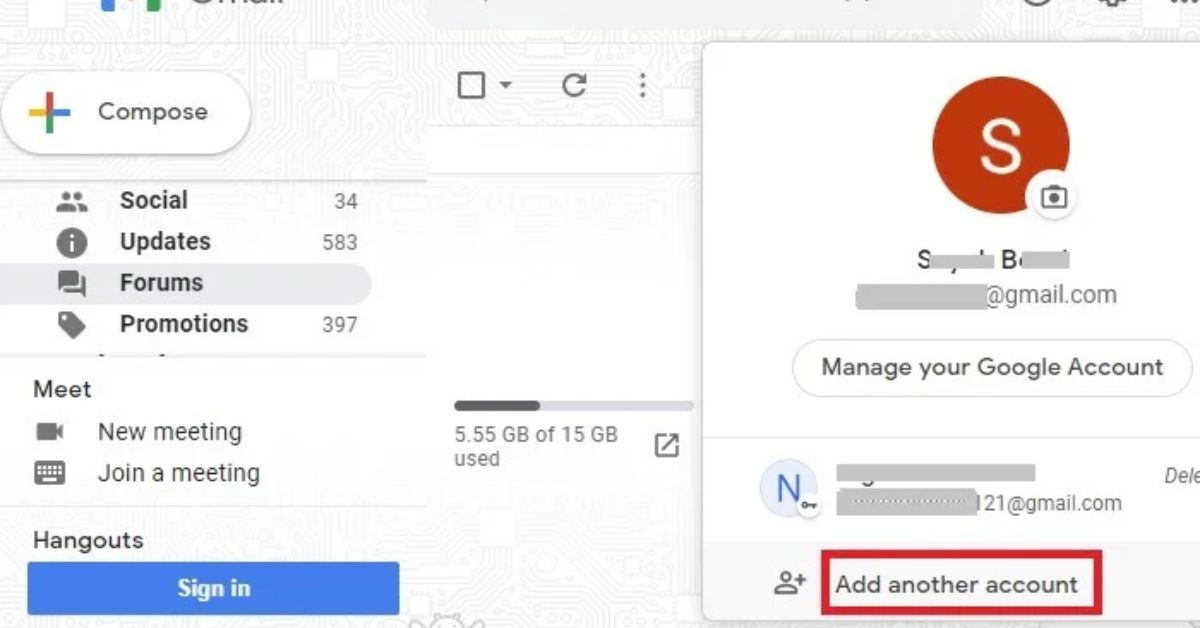
Step 1: Log in to your number one Gmail account, so it can act as the main hub for accessing and managing your other accounts. Go to the Gmail login web page (https://mail.google.com/) and provide the credentials for your primary account. After signing in, click your profile image in the top-right corner of the Gmail interface.
Step 2: Inside the drop-down menu, select ‘Add every other account’. A brand new window will appear, asking you to enter the login credentials for the additional Gmail account you want to feature. Enter the account email address and password and click ‘Next’.
Step 3: After adding a few balances, you can easily switch between them by clicking on your profile image again and selecting the preferred account from the list. Instead, you can use the ‘Check in with a specific account’ option inside the menu to add more accounts as desired.
Step 4: To differentiate between loans, assign specific labels and shades. To control labels, go to ‘Settings’ (gear icon) > ‘See all settings’ > ‘Labels’. Go to the Google Account Settings web page, scroll down to ‘Sign up with Google’, and click ‘Tools Pastime & Notifications’. Allow ‘Allow less comfortable apps’ to facilitate multiple signal-ins.
Step 5: Choose a default account to ensure that Google services, such as Google Pressure, always open with the preferred account. Go to ‘Settings’ > ‘See all settings’ > ‘Loans & Imports’ and set your default account.
Step 6: Remember to use one kind of Internet browser or browser profile for each Gmail account to avoid confusion and streamline your email control process.
Read This: Valentine’s Day Gift Ideas: Give a beautiful and unique gift to your loved ones